
Luxury Vinyl Transitions: How to Create a Seamless Look Against Hardwood and Tile
When you update your floors in Grand Rapids, MI, joining waterproof luxury vinyl plank with existing hardwood or ceramic tile is one of the most critical design details of your remodel. You want the resilient, worry-free performance of luxury vinyl in your busy mudroom, kitchen, or finished basement, but you also want a natural, elegant flow into your original hardwood living room or custom-tiled entryway.
Achieving a clean transition between these different flooring surfaces requires the right molding profile, careful subfloor preparation, and an understanding of how materials react to seasonal changes. With thoughtful design planning and certified installation techniques, you can eliminate tripping hazards and protect your floors while creating a cohesive, high-end look throughout your home.
Why Floor Transitions Matter Between Luxury Vinyl, Hardwood, and Tile
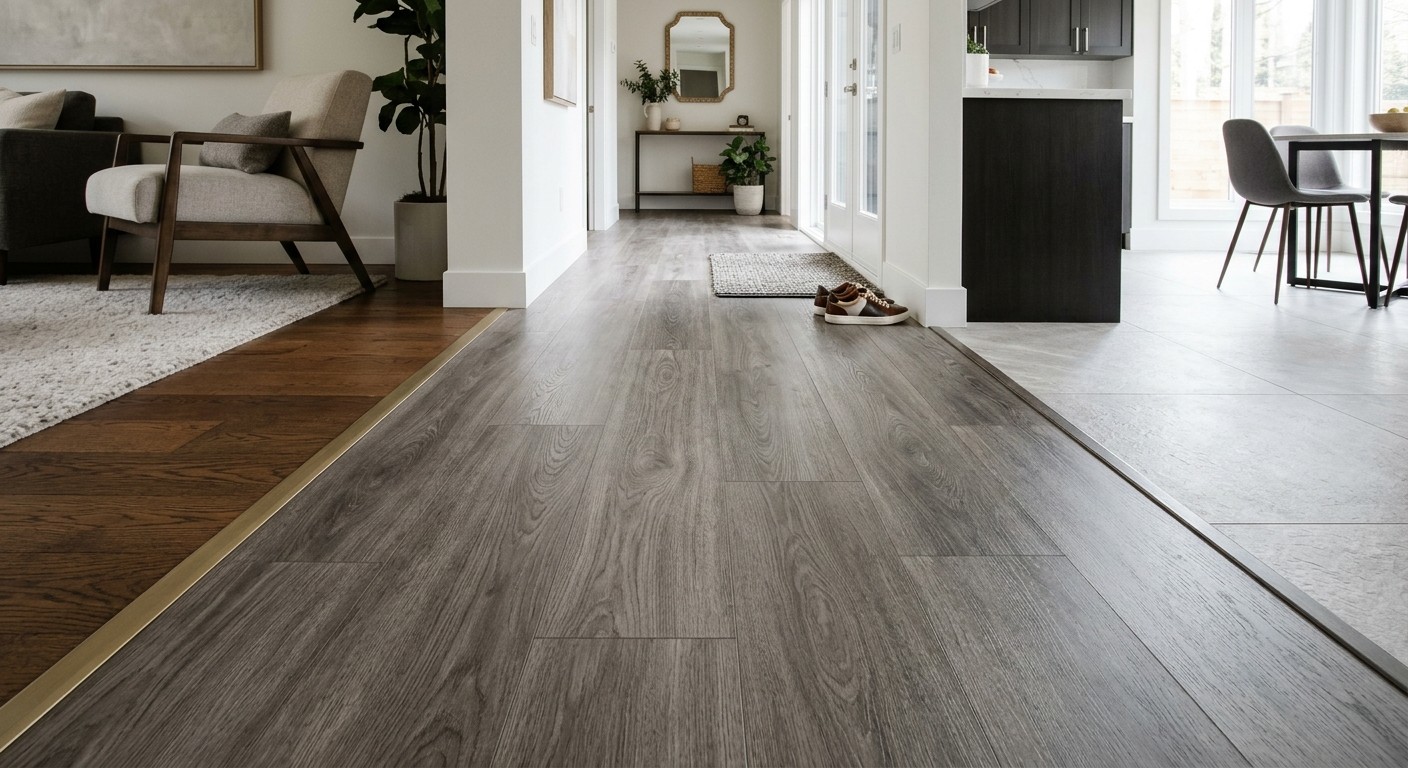
To create a clean, durable transition between luxury vinyl and hardwood or tile, you must bridge physical height differences, accommodate natural expansion, and shield exposed plank edges. Luxury vinyl typically measures between 2 mm and 8 mm in total thickness, while solid hardwood and mortared tile often stand 1/2 inch to 3/4 inch high. Transition moldings bridge this vertical variation safely while allowing floating luxury vinyl floors to expand and contract freely throughout the year.
Managing Height Differences Between Materials
When you step from room to room, even an eighth-inch variance can cause an uncomfortable tripping hazard or create an exposed edge that catches foot traffic. Luxury vinyl plank (LVP) and luxury vinyl tile (LVT) are engineered to be slim and lightweight. In contrast, solid hardwood sits 3/4 inch thick, and porcelain or ceramic tile rests atop mortar and backer board that easily reaches 1/2 inch to 3/4 inch in total height. If you do not plan your transitions carefully, you end up with an abrupt, sharp ledge that damages the locking mechanisms of your vinyl planks and catches shoes.
Accommodating Seasonal Humidity Shifts in Grand Rapids, MI
Here in West Michigan, our weather brings dramatic temperature and humidity swings. Humid summers cause authentic hardwood to swell, while dry winter indoor heating causes natural wood planks to shrink. Floating luxury vinyl floors also expand and contract as indoor temperatures shift throughout the seasons.
If you install luxury vinyl tight against hardwood or ceramic tile without leaving an expansion gap, the vinyl has nowhere to move. That trapped pressure leads to peaked edges, buckling planks, or cracked locking joints. A dedicated transition molding covers your required expansion space while keeping your floor edges shielded against daily wear.
The Best Transition Profiles for Luxury Vinyl to Hardwood and Tile
Choosing the right molding profile determines whether your transition looks like a deliberate design feature or an awkward afterthought. Here are the primary profiles you can choose to join luxury vinyl with hardwood and tile:
T-Molding for Equal-Height Floors
- Best for: Connecting two surfaces of the exact same height (or within 1/8 inch of each other).
- Profile shape: Symmetrical T-shape with a center vertical stem and curved top caps.
T-molding gets its name from its balanced cross-section. The vertical stem sits directly inside the expansion gap between your two floors, while the horizontal top caps rest gently over both finished edges. This profile works best when you install a rigid-core luxury vinyl plank that meets an engineered hardwood floor installed at the exact same subfloor level. It provides a balanced, low-profile divider that fits comfortably beneath standard interior doors.
Reducer Molding for Uneven Heights
- Best for: Joining thinner luxury vinyl to thicker hardwood or tile.
- Profile shape: Sloping ramp that tapers smoothly from high to low.
A reducer features a tapered top surface that gradually slopes down from a higher surface to a lower one. When your ceramic entryway tile or solid oak floor sits noticeably higher than your new luxury vinyl plank, a flush or overlap reducer eliminates the harsh lip. It creates an easy, sloping walk that prevents stubbed toes and keeps vacuums and wheeled carts rolling smoothly.
End Cap (Square Nose) for Raised Edges and Vertical Borders
- Best for: High-profile tile borders, sliding patio doors, and stone fireplace hearths.
- Profile shape: L-shaped molding with a squared-off top edge.
An end cap, often called a square nose or baby threshold, features a flat, squared edge rather than a sloped ramp. If you are running luxury vinyl up against a thick stone tile floor, a brick fireplace hearth, or an exterior sliding glass door track, an end cap wraps the raw vinyl edge and creates a crisp, tailored frame.
Slim Metal Profiles for Modern Architectural Lines
- Best for: Modern, minimalist aesthetics and flush-set porcelain tile borders.
- Profile shape: Ultra-thin metal trim in matte black, brushed nickel, or brass.
If you prefer a contemporary aesthetic without traditional curved moldings, slim metal profiles provide an architectural finish. These trims anchor into the tile setting bed and create a pencil-thin line between your luxury vinyl and tile. This approach requires precise subfloor leveling during installation so both flooring surfaces align at the exact same height.
Step-by-Step: How to Plan a Flawless Floor Transition in Your Home
1. Plan Subfloor Elevation Early
A seamless transition starts well before the first plank is laid. If you are remodeling an open-concept space where luxury vinyl meets kitchen tile, measure your existing subfloor elevations beforehand. Our team can add underlayment beneath the vinyl area to elevate it closer to your hardwood or tile. Bringing the two subfloor planes closer together allows you to use a flatter, less noticeable molding rather than a steep reducer.
2. Respect the Floating Expansion Gap
Never install floating luxury vinyl planks tight against existing tile or hardwood. Always leave a 1/4-inch to 5/16-inch expansion space between the edge of the plank and the adjoining floor. In Grand Rapids, MI, winter cold, tracked-in slush, and summer humidity put your floors to the test. Giving your vinyl space to breathe beneath the transition profile prevents buckling and protects your product warranty.
3. Coordinate Color Undertones Instead of Forcing an Exact Match
When transitioning luxury vinyl to authentic hardwood, trying to find an exact wood-grain duplicate often results in an awkward, near-miss look. Instead, select a luxury vinyl plank that intentionally complements your hardwood by matching the underlying tone (warm, cool, or neutral). Alternatively, pair a realistic stone-look luxury vinyl tile next to your hardwood, or a rich wood-look plank next to porcelain tile, to create a natural, purposeful boundary between rooms.
4. Fasten the Track to the Subfloor, Never the Vinyl Planks
Most premium transition moldings utilize a metal or composite track. Secure this track directly into your subfloor using screws or construction adhesive, then snap the transition molding into the track. Never glue or nail the transition molding directly through your luxury vinyl planks. Pinning a floating floor prevents its natural movement and will cause planks to buckle across your room.
Frequently Asked Questions About Luxury Vinyl Transitions
Can you transition luxury vinyl directly to tile without a transition strip?
You can only transition luxury vinyl to tile without a molding strip if you choose a glue-down luxury vinyl product, level the subfloors to the exact same millimeter, and fill the joint with color-matched flexible silicone or urethane caulk. Floating click-lock vinyl floors always require an expansion gap covered by a transition molding to allow for normal temperature movement.
Which transition profiles work best for high-traffic entryways dealing with winter slush?
In busy entryways where Lake Effect snow, slush, and road salt are tracked inside, durable aluminum trim profiles or moisture-resistant composite moldings perform best. Natural wood transitions can absorb moisture and finish-wear over time, making composite or metal transitions the more durable choice for active mudrooms.
How do you transition luxury vinyl around curved tile borders or stone fireplaces?
For curved tile borders or rounded fireplace hearths, flexible polyurethane moldings can be shaped along the curve. These flexible strips can be custom-stained or painted to coordinate with your luxury vinyl or adjoining hardwood.
Visit Our Showrooms in Hudsonville or Ada to Start Your Flooring Journey
Whether you are updating an entryway to withstand winter slush or designing an open-concept living area with flowing luxury vinyl, tile, and hardwood, our certified team is here to help you get every detail right. Stop by either of our full-service design showrooms in Hudsonville or Ada to explore hundreds of luxury vinyl, hardwood, and tile samples in person, or reach out to our staff to schedule your free in-home measurement.
At DeGraaf Interiors, our family-owned team has served you across Grand Rapids, Hudsonville, Ada, Georgetown Township, and all of West Michigan since 1993. We take pride in our certified craftsmanship, right down to vacuuming your new floors so they are completely guest-ready the moment we finish. Discover what your neighbors have experienced by reading our customer reviews, and let us make your next home project seamless from start to finish.
Written by Kailyn DeGraaf